It’s time to fine-tune your bike’s performance and make your rides smoother and more efficient. By making a few simple adjustments, you can ensure that your gears shift accurately and effortlessly, allowing you to tackle any terrain with ease. We will walk you through the steps to adjust your rear derailleur for optimal shifting. From understanding the rear derailleur to fine-tuning the cable tension, we’ve got you covered.
1. Understanding the Rear Derailleur
To understand the rear derailleur, you need to know how it functions and what role it plays in shifting gears on your bike.
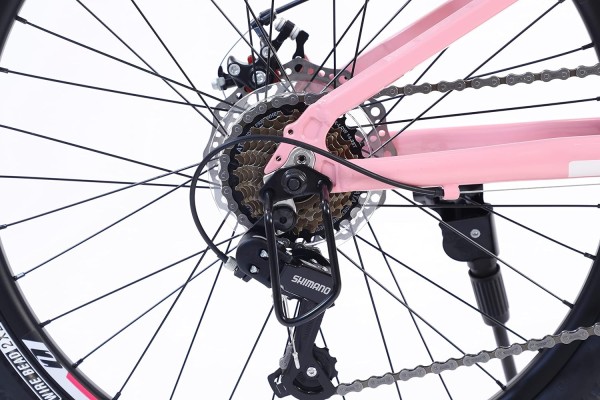
The rear derailleur is a key component of the drivetrain system, responsible for moving the chain between different gears on the rear cassette. When you shift gears using the shifter, the rear derailleur moves the chain onto a different cog on the cassette, allowing you to pedal at a higher or lower gear ratio.
The derailleur achieves this by using a combination of springs, pulleys, and tension to guide the chain onto the desired cog. It’s important to keep the rear derailleur properly adjusted to ensure smooth and precise gear shifting. Understanding the inner workings of the rear derailleur will help you diagnose and fix any issues that may arise during your rides.
2. Assessing the Gear Shifting Issues
First, assess the gear shifting issues by observing any skipping or hesitation in your bike’s performance. Pay close attention to how the chain moves between gears. If you notice the chain skipping or jumping when shifting, it indicates a misalignment or improper tension in the rear derailleur.
Hesitation or delay in shifting can be a sign of cable stretch or a worn-out derailleur. Take note of any unusual noises or grinding sensations while shifting, as these could also indicate an issue with the derailleur. Additionally, check if the chain is properly aligned with the gears. A misaligned chain can cause poor shifting performance.
3. Adjusting the High and Low Limit Screws
To adjust the high and low limit screws on your rear derailleur for better shifting, you’ll need to ensure the chain is in the smallest chainring and the smallest rear cog. These limit screws are responsible for controlling the movement range of the derailleur.
The high-limit screw limits the inward movement of the derailleur, preventing the chain from shifting over the smallest chainring, while the low-limit screw limits the outward movement, preventing the chain from shifting over the largest chainring.
Start by locating these screws on the rear derailleur mechanism, usually labeled ‘H’ and ‘L’ respectively. Use a screwdriver to make small adjustments, tightening or loosening the screws as needed until the chain shifts smoothly across all gears without any rubbing on the derailleur.
4. Fine-Tuning the Cable Tension
To fine-tune the cable tension of your rear derailleur for better shifting, you can make small adjustments using subordinating conjunction, active voice, and contractions. Here’s how:
- Shift your bike to the smallest rear cog and the smallest front chainring.
- Locate the barrel adjuster on the rear derailleur or the shifter.
- Turn the barrel adjuster clockwise to increase cable tension or counterclockwise to decrease tension.
- Shift through the gears to test the adjustments and make further tweaks if necessary.
You can ensure smooth and precise shifting on your bike by fine-tuning the cable tension. Make small adjustments and test the shifting after each change to find the optimal tension.
5. Testing and Fine-Tuning the Shifting Performance
To further improve the shifting performance, continue by testing and fine-tuning the cable tension on your rear derailleur. Begin by shifting the chain to the smallest rear cog and the smallest front chainring. Then, turn the barrel adjuster on your derailleur clockwise to tighten the cable tension.
Shift up to the next rear cog and observe the shifting performance. If the chain hesitates or struggles to move onto the larger cog, the cable tension is too tight. In this case, turn the barrel adjuster counterclockwise to loosen the tension slightly. Repeat the process by shifting through all the gears and making small adjustments to the cable tension as necessary.
Frequently Asked Questions
How Often Should I Clean and Lubricate My Rear Derailleur?
To keep your rear derailleur running smoothly, it’s important to clean and lubricate it regularly. The frequency of this maintenance depends on your riding conditions.
If you ride in wet and muddy conditions, you should clean and lubricate your derailleur more often, perhaps every few rides. On the other hand, if you ride in dry and clean conditions, you can get away with cleaning and lubricating it every few weeks.
Can I Use a Different Brand of Derailleur Cable for My Bike?
Sure, you can use a different brand of derailleur cable for your bike. However, it’s important to consider the compatibility and quality. Different brands may have varying designs and tolerances, which could affect the shifting performance. It’s recommended to consult with a professional or refer to the manufacturer’s guidelines to ensure proper installation and optimal shifting.
What Are Some Common Signs That My Rear Derailleur Needs to Be Replaced?
If you’re experiencing issues with your rear derailleur, it may be a sign that it needs to be replaced. Common signs include difficulty shifting gears, chain skipping or slipping, excessive noise, or the derailleur not moving smoothly. These issues can often be resolved through proper adjustment, but if they persist, it’s likely time for a replacement.
Regular maintenance and inspection can help identify any potential problems early on and ensure optimal performance of your bike’s drivetrain.
Conclusion
Now that you have mastered the art of adjusting your rear derailleur, your gears will shift with precision and ease. No more clunky shifts or missed gears. With a few simple adjustments, your bike will glide smoothly through each gear, creating a seamless and enjoyable riding experience. So get out there and pedal away, knowing that you have the knowledge and expertise to keep your rear derailleur in top shape.